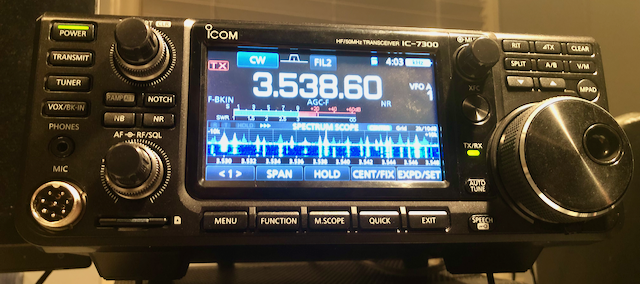
An Icom IC-7300 was my first HF radio. It is a jack-of-all-trades software defined radio (SDR) and I use it for a variety of purposes. I will describe how I have it wired, what menu settings I find helpful, and why. This guide covers settings for CW, SSB, and FT8 digital modes. RTTY is not included (future post?).
NOTE: This article describes the configuration I use for the Icom IC-7300 radio. For details about configuring the computer software for various operating modes, see a future article.
NOTE: The following settings are changes from the default settings while using firmware version 1.41. A full reset was performed prior to configuring these settings.
Where the Cables Go
The following diagram shows how I have connected by IC-7300 into the rest of my station. This setup allows me to contest, chase POTA stations, participate in my club’s 6m net, and rack up DXCC entities using FT8.
Waterfall Enhancements
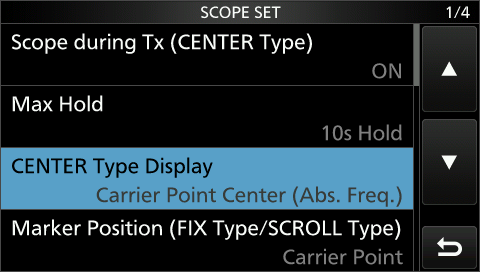
A few improvements can be made to ease visual navigation of the bands using the waterfall display. The first is the most important: the radio should place the VFO cursor on the carrier frequency. By default, the cursor is displayed in the “middle of the filter”, meaning you have to eyeball the center of a signal to tune it properly. It’s much easier to tune in SSB signals by placing the cursor on it’s upper or lower skirt (depending on whether it’s upper or lower sideband).
MENU -> SCOPE -> EXPD/SET (long hold) -> CENTER Type Display
  -> Carrier Point Center (Abs. Freq.)
Adding a little bit of averaging makes the waterfall a bit more pleasant to watch.
MENU -> SCOPE -> EXPD/SET (long hold) -> Averaging -> 2

I enjoy a blue-green color scheme for the waterfall display (similar to FlexRadio). Here are the settings I use:
MENU -> SCOPE -> EXPD/SET (long hold) -> Waveform Type -> Fill+Line
MENU -> SCOPE -> EXPD/SET (long hold) -> Waveform Color (Current) -> RGB: 0,100,100
MENU -> SCOPE -> EXPD/SET (long hold) -> Waveform Color (Line) -> RGB: 0,255,255
MENU -> SCOPE -> EXPD/SET (long hold) -> Waveform Color (Max Hold) -> RGB: 0,40,40
Here is the end result with a few things worth pointing out.
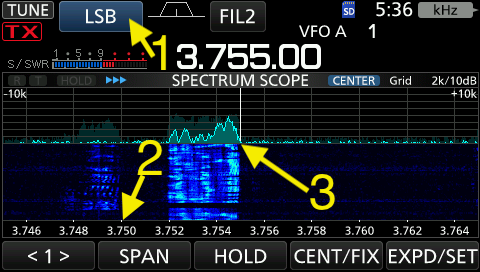
- The mode is set to lower side band (LSB).
- Frequencies are shown along the bottom. An adjancent signal’s frequency can be determined and tuned using the VFO, such as the one at 3.750 MHz.
- The VFO cursor is positioned to listen to the lower-frequency side (left side) for a lower side band (LSB) signal.
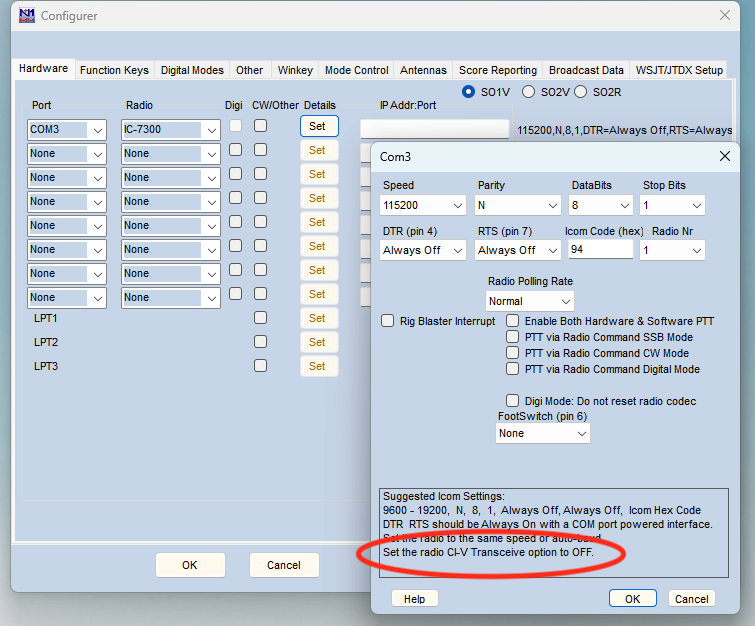
N1MM Setup
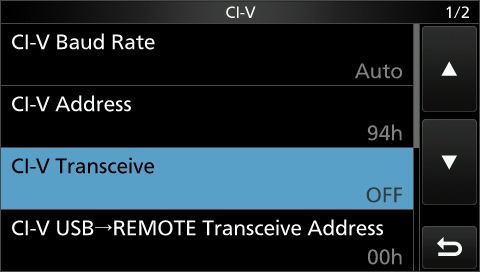
The N1MM Logger+ is inevitable if you plan to participate in amateur radio contests. The N1MM directions say to set CI-V Transceive option to OFF, so here it is:
MENU -> SET -> Connectors -> CI-V -> CI-V Transceive -> OFF
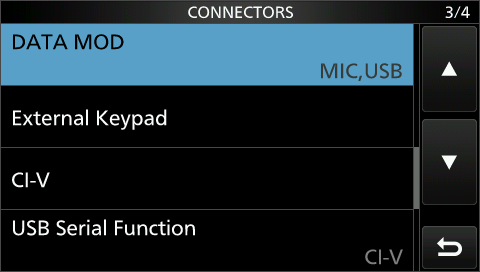
FT8 via WSJT-X
Use the following settings to set the modulation source when in/out of data mode.
MENU -> SET -> Connectors -> DATA MOD -> MIC,USB
MENU -> SET -> Connectors -> DATA OFF MOD -> MIC,USB

See a future article for details about setting up WSJT-X.
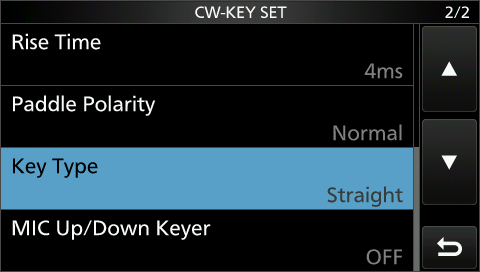
K1EL WinKeyer
Easy stuff first. The keyer looks like a straight key to the radio. Therefore, set the IC-7300 CW key type to straight key:
MODE -> CW
MENU -> KEYER -> EDIT/SET -> CW-KEY SET -> Key Type -> Straight
Chasing DX
Many DX stations operate split when using CW, meaning they transmit on one frequency and usually listen on a frequency 2-5 kHZ higher. They vary their listening frequency in order to “work the pileup,” since there might be dozens of stations calling them trying to add to their DXCC counts.
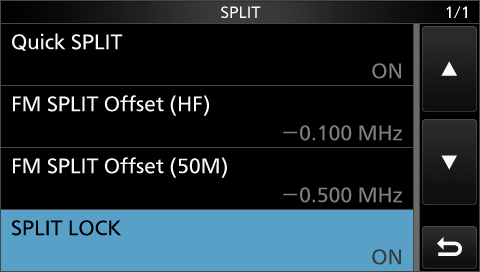
Enable the split lock feature:
MENU -> SET -> Function -> SPLIT -> SPLIT LOCK -> ON
To operate split and work the DX station:
- Tune to their transmit frequency and press the
Speech/LOCKbutton. This will prevent you from accidentally changing your listen frequency while you find the best transmit frequency. - Press the
SPLITbutton to enable receiving and transmitting on different frequencies. - Press and hold the
SPLITbutton to make your transmit and receive frequencies the same. - Use the waterfall to visually determine the frequency of the calling station currently working the DX station.
- Press and hold the
XFCbutton while spinning the VFO to position your transmit frequency to be near the previously worked calling station. The Split Lock feature allows you to change frequency while holdingXFC, all while maintaining the lock on your receive frequency. This allows you to quickly flip back and forth and adjust your transmit frequency by holding theXFCbutton. Good luck!
General-class Band Edge Beeps
Since I am a US-based ham with a General class license, I need to keep an eye on my frequency as I move around the bands. This is especially true when using CAT control (computer aided transceiver) of the radio. When chasing contest multipliers, N1MM has changed my frequency to one outside of my license privileges. I have to ensure that I do not transmit on such frequencies.
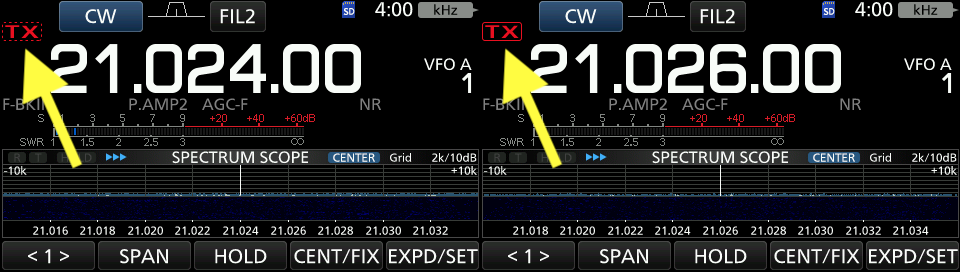
The IC-7300 allows a user to program band edges into the radio. Once complete the radio provides two mechanisms when you cross a frequency boundary:
- An audio indicator - the radio will beep.
- A visual indicator - the TX indicator will change from a solid border to a dashed border (see below).
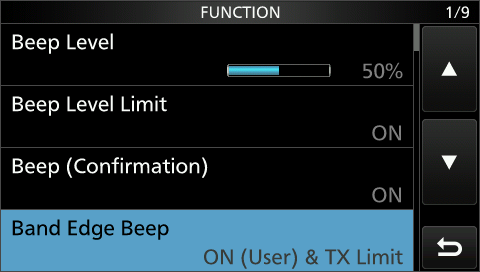
To configure band edges, use the settings below:
MENU -> SET -> Function -> Band Edge Beep -> ON (User) & TX Limit
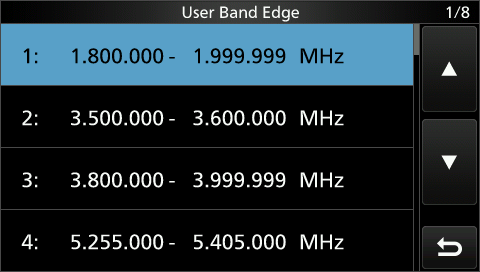
MENU -> SET -> Function -> User Band Edge -> 1.800.000 - 1.999.999 MHz
MENU -> SET -> Function -> User Band Edge -> 3.525.000 - 3.600.000 MHz
MENU -> SET -> Function -> User Band Edge -> 3.800.000 - 3.999.000 MHz
MENU -> SET -> Function -> User Band Edge -> 5.255.000 - 5.405.000 MHz
MENU -> SET -> Function -> User Band Edge -> 7.025.000 - 7.125.000 MHz
MENU -> SET -> Function -> User Band Edge -> 7.175.000 - 7.300.000 MHz
MENU -> SET -> Function -> User Band Edge -> 10.100.000 - 10.150.000 MHz
MENU -> SET -> Function -> User Band Edge -> 14.025.000 - 14.150.000 MHz
MENU -> SET -> Function -> User Band Edge -> 14.225.000 - 14.350.000 MHz
MENU -> SET -> Function -> User Band Edge -> 18.068.000 - 18.168.000 MHz
MENU -> SET -> Function -> User Band Edge -> 21.025.000 - 21.200.000 MHz
MENU -> SET -> Function -> User Band Edge -> 21.275.000 - 21.450.000 MHz
MENU -> SET -> Function -> User Band Edge -> 24.890.000 - 24.990.000 MHz
MENU -> SET -> Function -> User Band Edge -> 28.000.000 - 29.700.000 MHz
Memory Settings
There are several interesting things to listen to on a general coverage radio, excluding amateur radio rag chews. They include, but are not limited to:
- CW Beacons (useful for gauging propagation conditions)
- WWV (always know the time)
- HF Global Communications System Emergency Action Messages (hello SkyKing)
- Numbers stations (spy stuff)
I program a number of these frequencies into my radio for quick access.
Miscellaneous
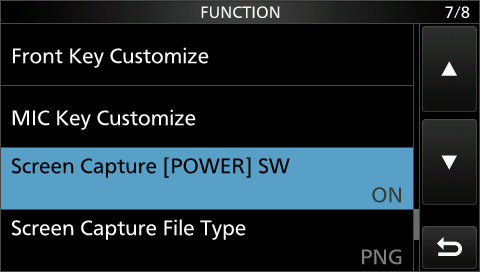
Screen captures are great feature of the IC-7300, as shown in this post. Enable them using the following setting:
MENU -> SET -> Function -> Screen Capture [POWER] SW -> ON
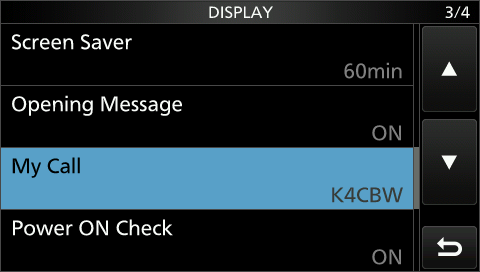
You can put your callsign or any funny message to be displayed at power on using:
MENU -> SET -> Display -> My Call -> K4CBW